- Source Code: Magic_blocks.zip
- Tiles: tiles.zip
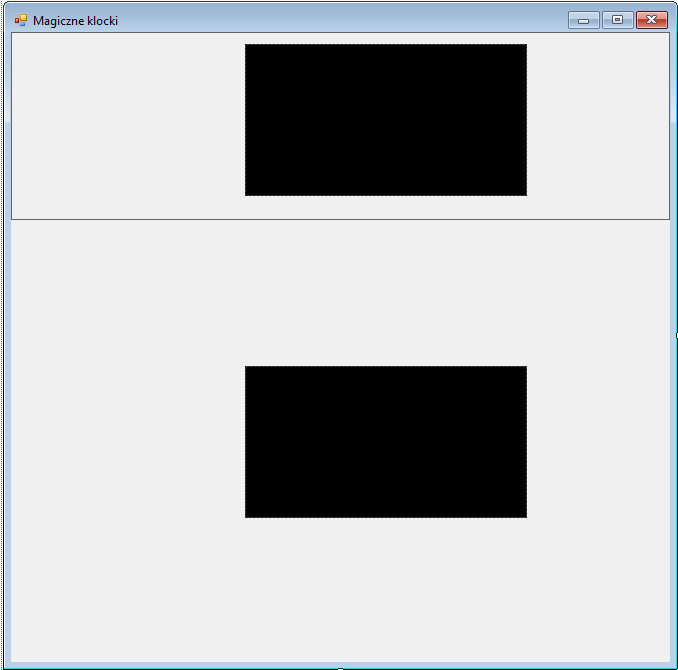
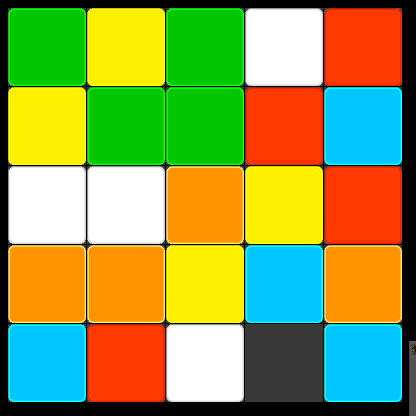
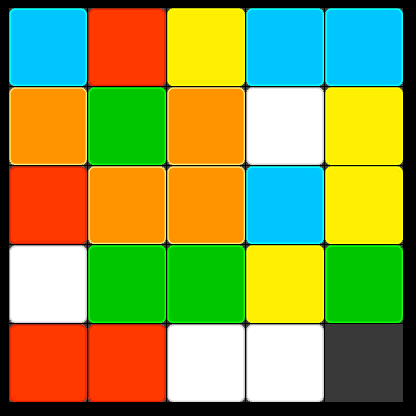
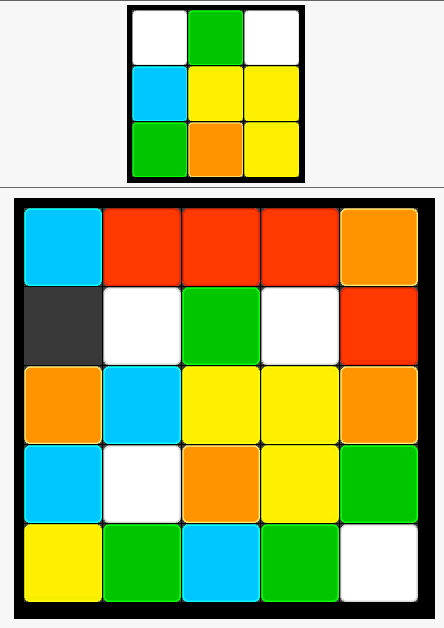
I’ve recently seen a board game on the TV, called the “Magic Block Game” and it looked very interesting. So I decided to write a tutorial how to write such a game in vb.net. Of course it will be one of those lessons where I’ll show you how to do it and how it works. Will you make a game on time or competing on a single computer, or maybe on a network I already leave you behind. Rules are simple move the squares so that in the middle of the main board create the generated pattern, but only move those elements adjacent to the empty field, the game will Looks like this:

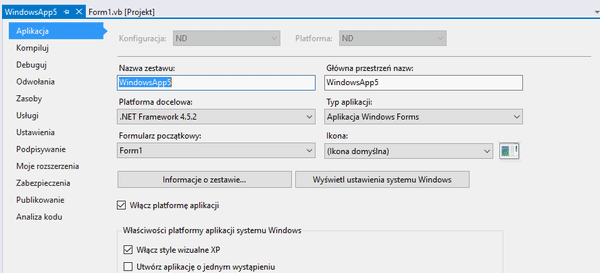
The added advantage is that we will be able to edit the size without data loss. We will start by preparing the form. Here there will be not much work, because all elements will be generated automatically:
 |
|
In addition, we must have six tiles. Our main board will have 25 fields, ie 6 * 4 = 24 + empty field. Tiles to download: tiles.zip
You need to unzip them into a folder and mount them like on the gif:
Okay, it’s all set. We’ll start by adding variables, then we’ll add methods that we’ll discuss.
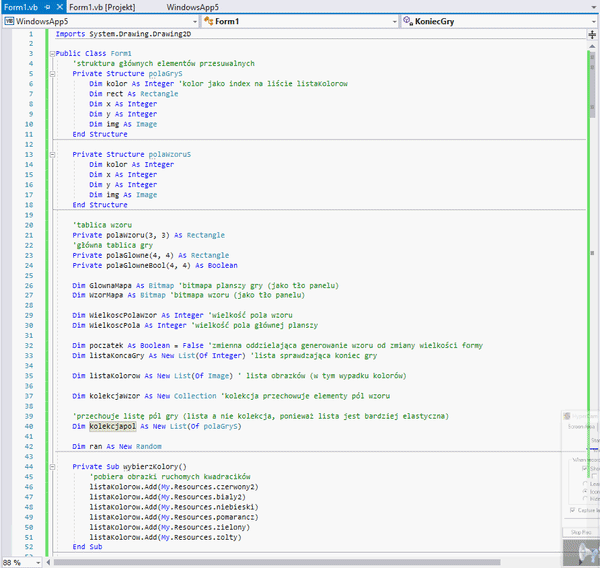
Imports System.Drawing.Drawing2D

Public Class Form1
    'Main Structure of the sliding elements
    Private Structure polaGryS
        Dim Col As Integer 'Color as an index in the listaKolorow
        Dim rect As Rectangle
        Dim x As Integer
        Dim y As Integer
        Dim img As Image
    End Structure

    Private Structure fPatternStr
        Dim col As Integer
        Dim x As Integer
        Dim y As Integer
        Dim img As Image
    End Structure


    'Pattern board
    Private fPattern(3, 3) As Rectangle
    'Main board game board
    Private mFields(4, 4) As Rectangle
    Private mFieldsBool(4, 4) As Boolean

    Dim mBitmap As Bitmap 'Game board bitmap (as a panel background)
    Dim patternBitmap As Bitmap 'Pattern bitmap (as a panel background)

    Dim PatternFieldSize As Integer 'Size of the pattern field
    Dim FieldSize As Integer 'Size of the main board field

    Dim GameStart As Boolean = False 'Variable separating pattern generation from variation of mold size
    Dim GameOverList As New List(Of Integer) 'Checklist for the end of the game

    Dim ColorsList As New List(Of Image) ' List of images (in this case colors)

    Dim PatternCollection As New Collection 'The collection stores the elements of the pattern fields

    'Keeps list of game fields (list, not collection, because list is more flexible)
    Dim FieldCollection As New List(Of polaGryS)

    Dim ran As New Random

    Private Sub Form1_Load(sender As Object, e As EventArgs) Handles MyBase.Load

    End Sub
End Class
We need to import the System.Drawing.Drawing2D library whose element we use to adjust the size of the image to the size of the field. We will begin by preparing our tiles, add them to the “Color List” list, we will create a method that will do this before generating the pattern and fields. Add to project:
    Private Sub ColorSet()
        'Takes pictures of moving squares
        ColorsList.Add(My.Resources.czerwony2)
        ColorsList.Add(My.Resources.bialy2)
        ColorsList.Add(My.Resources.niebieski)
        ColorsList.Add(My.Resources.pomarancz)
        ColorsList.Add(My.Resources.zielony)
        ColorsList.Add(My.Resources.zolty)
    End Sub

    Private Sub Form1_Load(sender As Object, e As EventArgs) Handles MyBase.Load
        'Set the game
        ColorSet()
        SizeChange()
        GameStart = True
    End Sub
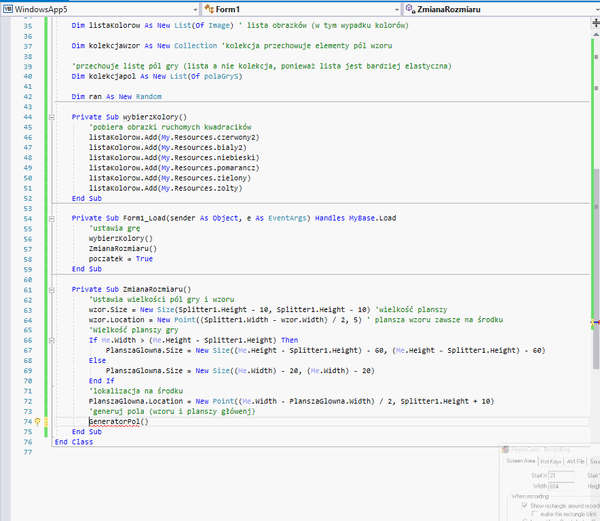
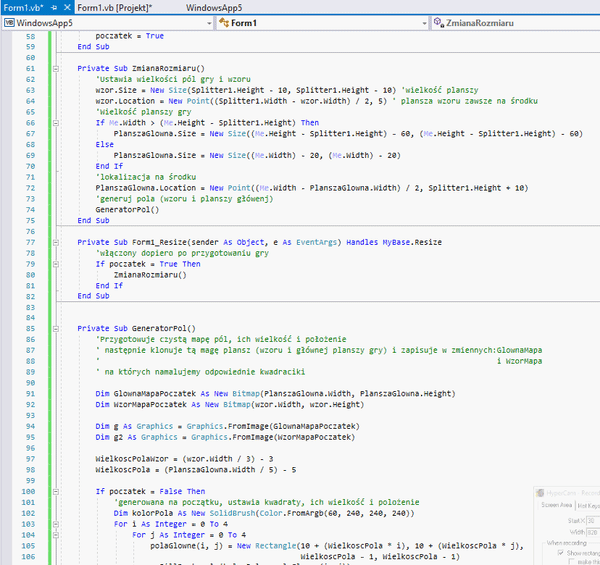
The “ColorSet()” method will populate our tiled list. You need to adjust the number of items in the list so that it can be multiplied by the number of possible choices. 24. Now you can choose one tile as 4, because 4 * 6 = 24, if we want to increase or decrease the number of tiles we would do it as follows 6 * 4 = 24 or 8 * 3 = 24, 3 * 8 = 24, 2 * 12 = 24, 1 * 24 = 24 etc. When we load a tile list, we go to the pattern and main game board settings. You need to adjust their size, the size of the pattern board will depend on the size of Splitter1 and the game board size of the mold, add the method to the project:
    Private Sub SizeChange()
        'Sets the size of the game fields and pattern
        pattern.Size = New Size(Splitter1.Height - 10, Splitter1.Height - 10) 'Size of the board
        pattern.Location = New Point((Splitter1.Width - pattern.Width) / 2, 5) 'The pattern board is always in the middle
        'The size of the game board
        If Me.Width > (Me.Height - Splitter1.Height) Then
            MainBoard.Size = New Size((Me.Height - Splitter1.Height) - 60, (Me.Height - Splitter1.Height) - 60)
        Else
            MainBoard.Size = New Size((Me.Width) - 20, (Me.Width) - 20)
        End If
        'Location in the middle
        MainBoard.Location = New Point((Me.Width - MainBoard.Width) / 2, Splitter1.Height + 10)
        'generuj pola (wzoru i planszy główenj)
        FieldsGenerator()
    End Sub
It’s look like this:
For the changes in real time will be responsible the following method:
    Private Sub Form1_Resize(sender As Object, e As EventArgs) Handles MyBase.Resize
        'Enabled only after game preparation
        If GameStart = True Then
            SizeChange()
        End If
    End Sub
When changing the size of the main form, the size of the boards will be updated. Now let’s take a look at the design of the pattern and the game fields so that the game makes sense, the fields must be generated randomly. As for the pattern, its fields will not change location, so this element will be more static. The main game board will be more complex, this space will consist of several elements:
(PlanszaGlowna=MainBoard,polaGlowne=mFields,polaGlowneBool=mFieldsBool, kolekcjapol=FieldCollection)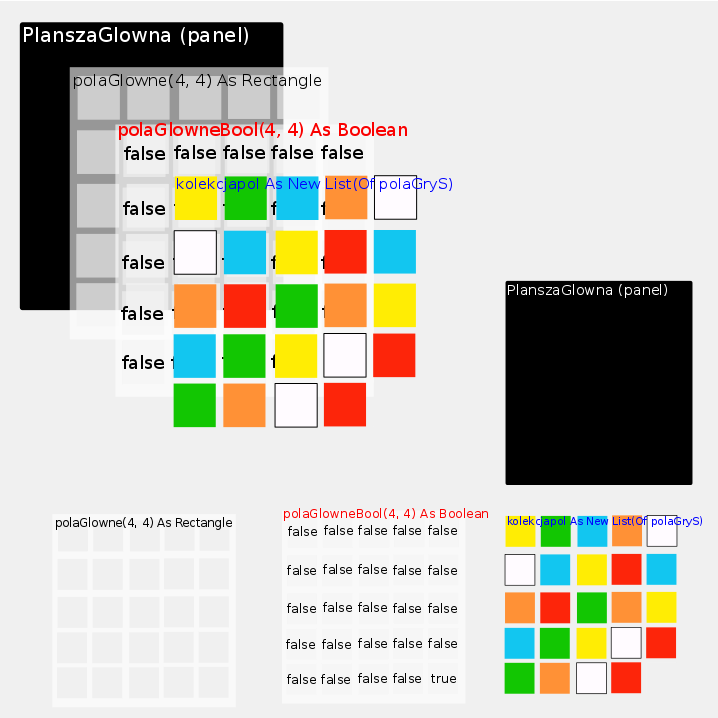
mFieldsBool- specifies the locations of the empty field.
mFields – their size is generated when the size of the board changes, we put our image color in them
This method has two states. The first is run when the game starts, he prepares both play boards. The second is when the board is loaded and we change its size.
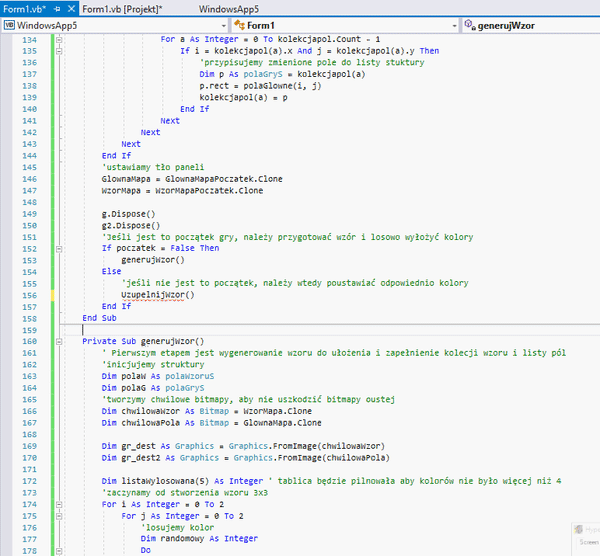
     Private Sub FieldsGenerator()

        ' Prepares a clear map Of the fields, their size And location
        'then clone the board of the game (pattern And main game board) nad writes in variables: mBitmap And patternBitmap
        ' which we paint appropriate squares

        Dim MainBitmapRize As New Bitmap(MainBoard.Width, MainBoard.Height)
        Dim PatternBitmapRise As New Bitmap(pattern.Width, pattern.Height)

        Dim g As Graphics = Graphics.FromImage(MainBitmapRize)
        Dim g2 As Graphics = Graphics.FromImage(PatternBitmapRise)

        PatternFieldSize = (pattern.Width / 3) - 3
        FieldSize = (MainBoard.Width / 5) - 5

        If GameStart = False Then
            'Generated in the beginning, it sets the squares, their size and location
            Dim Fcolor As New SolidBrush(Color.FromArgb(60, 240, 240, 240))
            For i As Integer = 0 To 4
                For j As Integer = 0 To 4
                    mFields(i, j) = New Rectangle(10 + (FieldSize * i), 10 + (FieldSize * j), FieldSize - 1, FieldSize - 1)
                    g.FillRectangle(Fcolor, mFields(i, j))

                    If Not j >= 3 Then
                        If Not i >= 3 Then
                            fPattern(i, j) = New Rectangle(5 + (PatternFieldSize * i), 5 + (PatternFieldSize * j), PatternFieldSize - 1, PatternFieldSize - 1)
                            g2.FillRectangle(Fcolor, fPattern(i, j))
                        End If
                    End If
                    'The mFieldsBool array defines which square is empty, in this case, the lower right corner
                    If Not (i = 4 And j = 4) Then
                        mFieldsBool(i, j) = False
                    Else
                        mFieldsBool(i, j) = True
                    End If
                Next
            Next
        Else
            'If this is not the beginning of the game, change only the size and position of the fields, we change the size of the fields in the list
            Dim Fcolor As New SolidBrush(Color.FromArgb(60, 240, 240, 240))
            For i As Integer = 0 To 4
                For j As Integer = 0 To 4
                    'We change the size of the public board
                    mFields(i, j) = New Rectangle(10 + (FieldSize * i), 10 + (FieldSize * j), FieldSize - 1, FieldSize - 1)
                    g.FillRectangle(Fcolor, mFields(i, j))
                    For a As Integer = 0 To FieldCollection.Count - 1
                        If i = FieldCollection(a).x And j = FieldCollection(a).y Then
                            'We assign the changed field to the structure list
                            Dim p As polaGryS = FieldCollection(a)
                            p.rect = mFields(i, j)
                            FieldCollection(a) = p
                        End If
                    Next
                Next
            Next
        End If
        'We set the background of the panels
        mBitmap = MainBitmapRize.Clone
        patternBitmap = PatternBitmapRise.Clone
        g.Dispose()
        g2.Dispose()
        'If this is the beginning of the game, you should prepare the pattern and randomly lay out colors
        If GameStart = False Then
            GenerateBoards()
        Else
            'If this is the beginning of the game, you should prepare the pattern and randomly lay out colors
            CompleteFields()
        End If

    End Sub
Momentarily nothing is happening, because we have only prepared the main fields and we have determined their size. If we add two lines of code, we’ll see what has been done:
        pattern.BackgroundImage = patternBitmap
        MainBoard.BackgroundImage = mainBitmap
We will now take the “GenerateBoards()” method that loads the tiles on the board and prepares the empty field:
     Private Sub GenerateBoards()
        ' collection and the list of fields

        'initiate the structure
        Dim FieldsW As fPatternStr
        Dim polaG As polaGryS
        'We create instant bitmaps to avoid damaging the main bitmap
        Dim iPatternBitmap As Bitmap = patternBitmap.Clone
        Dim iMainFields As Bitmap = mBitmap.Clone

        Dim gr_dest As Graphics = Graphics.FromImage(iPatternBitmap)
        Dim gr_dest2 As Graphics = Graphics.FromImage(iMainFields)

        Dim drawList(5) As Integer ' The board will ensure that the colors are no more than 4
        'We start by creating a 3x3 pattern
        For i As Integer = 0 To 2
            For j As Integer = 0 To 2
                'We draw the color
                Dim rand As Integer
                Do
                    rand = ran.Next(0, 6)
                    'If we have three draws of such colors, then we draw again
                    If drawList(rand) + 1 <= 4 Then
                        Exit Do
                    End If
                Loop
                'We fill in the data structure
                FieldsW.x = i
                FieldsW.y = j
                FieldsW.col = rand
                FieldsW.img = cheSize(ColorsList(rand), New Size(PatternFieldSize, PatternFieldSize))

                GameOverList.Add(rand)
                drawList(rand) += 1 'We add a color to the list watching the color amount
                'drw elements
                gr_dest.DrawImage(FieldsW.img, fPattern(i, j).Location.X, fPattern(i, j).Location.Y, FieldsW.img.Width - 1, FieldsW.img.Height - 1)
                PatternCollection.Add(FieldsW) ' We complete the collection
            Next
        Next
        'we generete 5x5 board
        'clean board
        ReDim drawList(5) ' The board will ensure that the colors are no more than 4
        For i As Integer = 0 To 4
            For j As Integer = 0 To 4
                'Complements only false fields, leaving one clean field
                If mFieldsBool(i, j) = False Then
                    'We draw the color
                    Dim rand As Integer
                    Do
                        rand = ran.Next(0, 6)
                        If drawList(rand) + 1 <= 4 Then
                            Exit Do
                        End If
                    Loop
                    'We fill in the data structure
                    polaG.rect = mFields(i, j)
                    polaG.x = i
                    polaG.y = j
                    polaG.Col = rand
                    polaG.img = cheSize(ColorsList(rand), New Size(FieldSize, FieldSize))

                    drawList(rand) += 1 'We add a color to the list watching the color amount
                    'drw elements
                    gr_dest2.DrawImage(polaG.img, mFields(i, j).Location.X, mFields(i, j).Location.Y, polaG.img.Width - 1, polaG.img.Height - 1)
                    FieldCollection.Add(polaG) ' We complete the collection
                End If
            Next
        Next
        'We set new panel backgrounds
        pattern.Image = iPatternBitmap
        MainBoard.Image = iMainFields
    End Sub
The variable “rand” is responsible for drawing the tile, “drawList” makes sure that one tile is no more than four. If you want to increase or decrease the number of tiles, you must change these options according to the number of tiles you have. Depending on the size of the fields, we have to prepare such images of our tiles so that it is the size of a predefined field. So the function “cheSize()” is responsible for reduce or enlarge its size, which uses library System.Drawing.Drawing2D .
     Public Shared Function cheSize(ByVal img As Image, ByVal largeness As Size, Optional ByVal keepImageRatio As Boolean = True) As Image

        Dim NewWidth As Integer
        Dim NewHeight As Integer
        'We determine the size of the new image, depending on whether the aspect ratio is to be retained
        If keepImageRatio Then
            Dim OriginalWidth As Integer = img.Width
            Dim OriginalHeight As Integer = img.Height
            Dim PreWidth As Single = CSng(largeness.Width) / CSng(OriginalWidth)
            Dim PreHeight As Single = CSng(largeness.Height) / CSng(OriginalHeight)
            Dim Percent As Single = If(PreHeight < PreWidth,
                PreHeight, PreWidth)
            NewWidth = CInt(OriginalWidth * Percent)
            NewHeight = CInt(OriginalHeight * Percent)
        Else
            NewWidth = largeness.Width
            NewHeight = largeness.Height
        End If

        Dim newImg As Image = New Bitmap(NewWidth, NewHeight)
        'We generate a new image
        Using graphicsHandle As Graphics = Graphics.FromImage(newImg)
            graphicsHandle.InterpolationMode = InterpolationMode.HighQualityBicubic
            graphicsHandle.DrawImage(img, 0, 0, NewWidth, NewHeight)
        End Using
        'Function returns newImg
        Return newImg
    End Function
How does it work:
As we can see, the fields are already added, but our fields do not conform to the size of the form, since the “Form1_Resize” method already has a “GameStart” variable set to true, meaning that if we change the form size, CompleteFields()”, if during the resize the” GenerateBoards()”method would be called, then during each change, the program would generate a new random pattern and new random fields. So let’s add the “CompleteFields()” method:
     Private Sub CompleteFields()
        'Method of changing game size pattern and board already generated
        Dim iPatternBitmap As Bitmap = patternBitmap.Clone
        Dim iMainBitmap As Bitmap = mBitmap.Clone

        Dim gr_dest As Graphics = Graphics.FromImage(iPatternBitmap)
        Dim gr_dest2 As Graphics = Graphics.FromImage(iMainBitmap)
        'First, we draw the colors Of the pattern On the basis Of the altered size Of the fields,
        'although Nothing Is tampered with here (by the molds of the mold) adds it may be useful to someone who does Not spoil,
        'you can remove it if you want
        For i As Integer = 0 To 2
            For j As Integer = 0 To 2
                For a As Integer = 1 To PatternCollection.Count
                    If i = PatternCollection(a).x And j = PatternCollection(a).y Then
                        Dim myimage As Image = cheSize(PatternCollection(a).img, New Size(PatternFieldSize, PatternFieldSize))
                        gr_dest.DrawImage(myimage, fPattern(i, j).Location.X, fPattern(i, j).Location.Y, myimage.Width - 1, myimage.Height - 1)
                    End If
                Next
            Next
        Next
        pattern.Image = iPatternBitmap 'We set the pattern panel background
        'Then we draw the colors of the main fields of the board based on these field sizes
        For i As Integer = 0 To 4
            For j As Integer = 0 To 4
                If mFieldsBool(i, j) = False Then
                    For a As Integer = 0 To FieldCollection.Count - 1
                        If i = FieldCollection(a).x And j = FieldCollection(a).y Then
                            Dim myimage As Image = cheSize(FieldCollection(a).img, New Size(FieldSize, FieldSize))
                            gr_dest2.DrawImage(myimage, FieldCollection(a).rect.Location.X, FieldCollection(a).rect.Location.Y, myimage.Width - 1, myimage.Height - 1)
                        End If
                    Next
                End If
            Next
        Next
        MainBoard.Image = iMainBitmap
        GameOver()
    End Sub
The first step of the method actually does nothing because the pattern board is stationary, the second step sets the tiles based on the “collectipipol” in which field coordinates, size and pictures are written. The last item that controls whether the game has ended:
     Private Sub GameOver()
        'The method checks the end of the game
        Dim YouWin As Boolean = True 'We assume it's over
        Dim CompList As New List(Of Integer) ' List storing the color numbers of the center of the board
        'Get the color numbers in the middle of the board
        For i As Integer = 1 To 3
            For j As Integer = 1 To 3
                For k As Integer = 0 To FieldCollection.Count - 1
                    If FieldCollection(k).x = i And FieldCollection(k).y = j Then
                        CompList.Add(FieldCollection(k).Col)
                    End If
                Next
            Next
        Next
        ' If there is no empty field in the middle, the method goes to comparing the list
        If CompList.Count = GameOverList.Count Then
            For i As Integer = 0 To GameOverList.Count - 1
                If Not GameOverList(i) = CompList(i) Then
                    'The lists are not identical, the end of the comparison
                    YouWin = False
                    Exit For
                End If
            Next
            If YouWin = True Then
                'Lists are the same
                MainBoard.Enabled = False
                MsgBox("Game over!")
            End If
        End If
    End Sub
It creates a comparative list in which the image indexes are stored in the “ColorsList” list. Then compare them and if they are identical (pattern – center of the game board) ends the game.
Of course this is not the end of the project, because somehow we have to move the tiles. We will start with the function keys. I will use arrows, but you can choose other keys. You have to think about what will be most convenient for you if you press the up arrow which tile will you move? You can move the tile under the empty field up or above the empty field down.
     Private Sub Form1_KeyDown(sender As Object, e As KeyEventArgs) Handles MyBase.KeyDown
        'Move with the arrow keys
        Dim Ilocation As Integer
        Dim Jlocation As Integer
        'We are getting the location of the empty field
        For i As Integer = 0 To 4
            For j As Integer = 0 To 4
                If mFieldsBool(i, j) = True Then
                    Ilocation = i
                    Jlocation = j
                End If
            Next
        Next
        'If this is not the end of the game, then we will check which key was used
        If MainBoard.Enabled = True Then
            If e.KeyCode = Keys.Down Then
                'down key
                If Not Jlocation = 0 Then 'If it was less than 0 then it would be outside the array
                    For a As Integer = 0 To FieldCollection.Count - 1
                        'Gets the location of the field above the blank field
                        If Ilocation = FieldCollection(a).x And (Jlocation - 1) = FieldCollection(a).y Then
                            'And change them to new ones
                            Dim p As polaGryS = FieldCollection(a)
                            p.y = Jlocation
                            p.rect = mFields(Ilocation, Jlocation)
                            FieldCollection(a) = p 'Overwrites an item in the list
                        End If
                    Next
                    'Changes the field's boolean value
                    mFieldsBool(Ilocation, Jlocation) = False
                    mFieldsBool(Ilocation, Jlocation - 1) = True
                End If
            ElseIf e.KeyCode = Keys.Up Then
                If Not Jlocation = 4 Then 'If it was more than 4 then it would be outside the array
                    For a As Integer = 0 To FieldCollection.Count - 1
                        If Ilocation = FieldCollection(a).x And (Jlocation + 1) = FieldCollection(a).y Then
                            Dim p As polaGryS = FieldCollection(a)
                            p.y = Jlocation
                            p.rect = mFields(Ilocation, Jlocation)
                            FieldCollection(a) = p
                        End If
                    Next
                    mFieldsBool(Ilocation, Jlocation) = False
                    mFieldsBool(Ilocation, Jlocation + 1) = True
                End If
            ElseIf e.KeyCode = Keys.Right Then
                If Not Ilocation = 0 Then 'If it was less than 0 then it would be outside the array
                    For a As Integer = 0 To FieldCollection.Count - 1
                        If (Ilocation - 1) = FieldCollection(a).x And Jlocation = FieldCollection(a).y Then
                            Dim p As polaGryS = FieldCollection(a)
                            p.x = Ilocation
                            p.rect = mFields(Ilocation, Jlocation)
                            FieldCollection(a) = p

                        End If
                    Next
                    mFieldsBool(Ilocation, Jlocation) = False
                    mFieldsBool(Ilocation - 1, Jlocation) = True
                End If
            ElseIf e.KeyCode = Keys.Left Then
                If Not Ilocation = 4 Then 'If it was more than 4 then it would be outside the array
                    For a As Integer = 0 To FieldCollection.Count - 1
                        If (Ilocation + 1) = FieldCollection(a).x And Jlocation = FieldCollection(a).y Then
                            Dim p As polaGryS = FieldCollection(a)
                            p.x = Ilocation
                            p.rect = mFields(Ilocation, Jlocation)
                            FieldCollection(a) = p
                        End If
                    Next
                    mFieldsBool(Ilocation, Jlocation) = False
                    mFieldsBool(Ilocation + 1, Jlocation) = True
                End If
            End If
        End If
        'Redraw new colors
        CompleteFields()
    End Sub
My settings relative to the empty field are:
 Down arrow
 Up arrow
 Left arrow
 Right arrow
The code retrieves the location of the empty field from the “mFieldsBool” table and locates the field by the pressed key. Then it clones the structure and changes its x or y field and occupies the (rect) field.
It will be a little harder with the mouse cursor. We add the “MouseMove” event to the “MainBoard” panel when the cursor is over the panel, the cursor coordinates e.x and e.y will be downloaded. Then, by specifying the location of the empty field, we search the collection “FieldCollection” and check that the cursor is not above the field (rect) to the left, right, above, or below. If it is, then the cursor will turn into a handle, if not the arrow.
     'mouse click
    Private Sub PlanszaGlowna_MouseMove(sender As Object, e As MouseEventArgs) Handles MainBoard.MouseMove
        'To be able to select a field using the left mouse button, you first need to specify where the mouse cursor is
        Dim Ilocation As Integer
        Dim Jlocation As Integer

        For i As Integer = 0 To 4
            For j As Integer = 0 To 4
                If mFieldsBool(i, j) = True Then
                    Ilocation = i
                    Jlocation = j
                End If
            Next
        Next

        For i As Integer = 0 To FieldCollection.Count - 1
            If (FieldCollection(i).rect.Location.X - 2 <= e.X And (FieldCollection(i).rect.Location.X + FieldCollection(i).rect.Width + 2 >= e.X)) _
                And (FieldCollection(i).rect.Location.Y - 2 <= e.Y And
                (FieldCollection(i).rect.Location.Y + FieldCollection(i).rect.Height + 2 >= e.Y)) Then
                'If the cursor is to the left or to the right of the empty field, the cursor will change to the handle
                If (FieldCollection(i).x - 1 = Ilocation Or FieldCollection(i).x + 1 = Ilocation) And FieldCollection(i).y = Jlocation Then
                    Me.Cursor = Cursors.Hand
                    Exit For
                End If
                'If the cursor is above or below the empty field, the cursor will change the type to the handle
                If (FieldCollection(i).y - 1 = Jlocation Or FieldCollection(i).y + 1 = Jlocation) And FieldCollection(i).x = Ilocation Then
                    Me.Cursor = Cursors.Hand
                    Exit For
                End If
            Else
                'The cursor will remain an arrow or change the arrow type if the above conditions are not met
                Me.Cursor = Cursors.Arrow
            End If
        Next
    End Sub
Effect like on gif below:
As you can see, the cursor changes its state to a handle. As for the click method, it is the same as when using the keys. The method checks to see if the cursor is over a field that is adjacent to an empty field (the code copied from MouseMove), if it specifies which square and clones its structure, substitutes data with an empty field and writes to the collection.
      Private Sub PlanszaGlowna_MouseClick(sender As Object, e As MouseEventArgs) Handles MainBoard.MouseClick
        Dim Ilocation As Integer
        Dim Jlocation As Integer
        'Gets the location of the empty field
        For i As Integer = 0 To 4
            For j As Integer = 0 To 4
                If mFieldsBool(i, j) = True Then
                    Ilocation = i
                    Jlocation = j
                End If
            Next
        Next
        'Looks at which field is the cursor
        For i As Integer = 0 To FieldCollection.Count - 1
            If (FieldCollection(i).rect.Location.X - 2 <= e.X And (FieldCollection(i).rect.Location.X +
                FieldCollection(i).rect.Width + 2 >= e.X)) And (FieldCollection(i).rect.Location.Y - 2 <= e.Y _
                And (FieldCollection(i).rect.Location.Y + FieldCollection(i).rect.Height + 2 >= e.Y)) Then
                'If you click the box to the right of the empty field
                If FieldCollection(i).x + 1 = Ilocation And FieldCollection(i).y = Jlocation Then
                    'Will retrieve the field structure from the list
                    Dim p As polaGryS = FieldCollection(i)
                    'change x location
                    p.x = Ilocation
                    'Will assign a new square
                    p.rect = mFields(Ilocation, Jlocation)
                    'Will overwrite the new structure in the list
                    FieldCollection(i) = p
                    'set new true/false position
                    mFieldsBool(Ilocation, Jlocation) = False
                    mFieldsBool(Ilocation - 1, Jlocation) = True
                End If
                'If you clicked the box to the left of the empty field
                If FieldCollection(i).x - 1 = Ilocation And FieldCollection(i).y = Jlocation Then
                    Dim p As polaGryS = FieldCollection(i)
                    p.x = Ilocation
                    p.rect = mFields(Ilocation, Jlocation)
                    FieldCollection(i) = p
                    mFieldsBool(Ilocation, Jlocation) = False
                    mFieldsBool(Ilocation + 1, Jlocation) = True
                End If
                'If you clicked the box is above the empty field
                If FieldCollection(i).y - 1 = Jlocation And FieldCollection(i).x = Ilocation Then
                    Dim p As polaGryS = FieldCollection(i)
                    p.y = Jlocation
                    p.rect = mFields(Ilocation, Jlocation)
                    FieldCollection(i) = p

                    mFieldsBool(Ilocation, Jlocation) = False
                    mFieldsBool(Ilocation, Jlocation + 1) = True
                End If
                'If you clicked the box is below the empty field
                If FieldCollection(i).y + 1 = Jlocation And FieldCollection(i).x = Ilocation Then
                    Dim p As polaGryS = FieldCollection(i)
                    p.y = Jlocation
                    p.rect = mFields(Ilocation, Jlocation)
                    FieldCollection(i) = p
                    mFieldsBool(Ilocation, Jlocation) = False
                    mFieldsBool(Ilocation, Jlocation - 1) = True
                End If
            End If
        Next
        CompleteFields()
    End Sub
Ok game is ready:
Now your turn, create and add as you like. Create the game you want it to be.